Best Lightroom Presets for Desert Photos: Warm Sand, Bold Light & Clean Dunes
Quick answer: The best Lightroom presets for desert photos keep the sand warm without turning it orange, hold the shape of every dune ridge, and protect the sky from washing out under harsh sun. A good desert preset balances glowing highlights with soft, detailed shadows so the landscape feels vast and calm rather than flat and scorched. Pick one warm, restrained style, adjust the exposure for the time of day, and let the dunes carry the picture.
Why Desert Light Is So Hard to Edit
Desert light is beautiful and unforgiving in equal measure. At midday the sun sits directly overhead and bleaches every colour out of the sand, while at golden hour the same dunes turn amber, rose and deep copper within a few minutes. A camera records both extremes faithfully, which means the edit has to do the work of deciding what the scene should feel like. Push the warmth too far and the sand looks like a painted backdrop; hold it back too much and the photograph loses the heat that made the desert worth shooting in the first place.
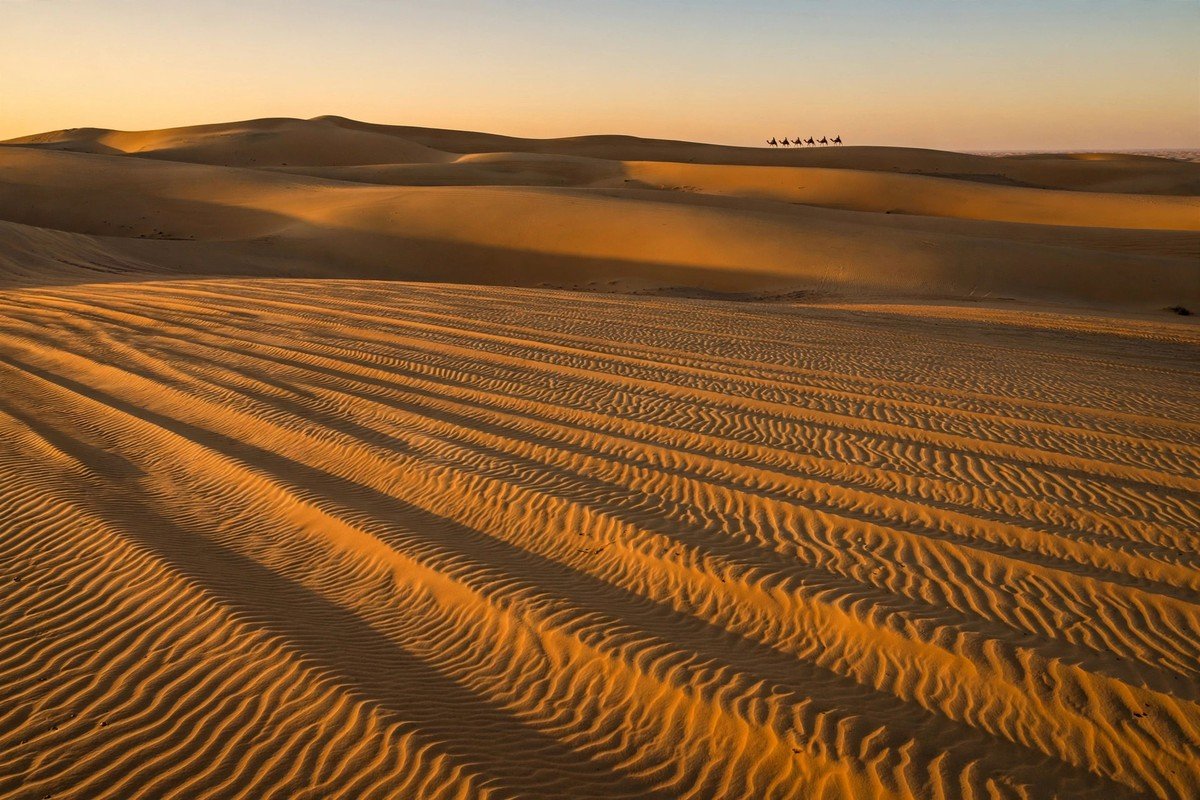
The second challenge is texture. Dunes are made of tiny ridges, ripples and wind-blown crests, and those details are what give a desert photograph its sense of scale. A heavy-handed edit smooths them away, leaving a blank slope that could be anywhere. The presets that work best in the desert preserve that fine grain. They keep the crest lines crisp, let the shadow side of each dune fall gently, and stop the brightest sand from turning into a featureless white patch.
Distance matters too. A desert frame often stretches from a close ripple in the foreground to a hazy horizon many miles away, and the edit has to hold both ends together. If the foreground is too dark, the viewer never steps into the scene; if the horizon is too bright, the whole image flattens out. A thoughtful desert preset manages that long journey, keeping the near sand detailed and the far dunes soft without letting either end dominate.
What Makes a Desert Preset Work
Start with the colour of the sand itself. Real desert sand is rarely a single colour: it shifts from pale cream in the shade to honey gold in direct sun, with hints of pink and rust where the light catches a steep slope. A strong preset respects that range instead of forcing everything toward one shade of orange. Look for a look that keeps pale sand pale and deep sand rich, so the photograph still feels like a real place rather than a colour filter.
Next, watch how the preset treats the sky. Desert skies are often huge, pale and almost empty, and a careless edit turns them chalky or grey. The best desert presets keep the sky clean and bright while holding just enough blue or warm haze near the horizon to give the frame depth. Clouds, when they appear, should keep their edges and their soft shadows instead of dissolving into a flat wash.
Contrast is the third test. A dune only reads as a dune because sunlit crests sit beside shaded troughs, so a grade that flattens either side erases the land’s shape. What you want is separation without harshness: lit edges should feel distinct from the darker hollows, yet the hollows must still reveal wind markings when you look closely. Try it by magnifying the shaded face of a dune — visible sand pattern there means the grade is working.
- Honest sand colour: cream, honey and rust tones kept distinct instead of pushed toward one orange.
- Crisp dune ridges: crest lines and wind ripples stay visible in both light and shade.
- Clean, open sky: a pale desert sky that keeps its depth without turning chalky.
- Open shadows: the shaded side of each dune still shows texture and pattern.
- Calm highlights: bright sand holds its colour instead of blowing out to white.
Preset Styles That Suit Desert Scenes
Warm golden presets are the most natural fit for desert photography. They deepen the amber light of late afternoon, soften the contrast a little, and give the sand a glowing, honeyed quality that suits dunes, rocky outcrops and dry riverbeds. This style shines in the hour before sunset, when the light is already warm and the preset only needs to echo it. Used gently, it makes a desert series feel like one long, beautiful evening.
Earthy film presets offer a quieter, more timeless alternative. They mute the colours slightly, add a faint grain, and give the frame the feeling of an old travel photograph. A lone tree, a weathered stone wall or a distant caravan suits this style well, because the softness of the grade matches the stillness of the place. The key is restraint: too much fade and the sand turns grey, too much grain and the fine dune texture disappears.
Bold contrast presets suit photographers who want drama from the desert. They darken the shadows, sharpen the ridge lines and make the light feel almost physical, which works beautifully for black-and-white conversions and for stark, graphic dune compositions. This style needs careful handling at midday, when the sun is already harsh, but in early morning or late evening it can turn a simple slope into a striking abstract shape.
Minimal bright presets take the opposite path, lifting the whole frame and keeping the colours pale and airy. They suit white sand deserts, salt flats and coastal dunes, where the landscape is already light and the photograph should feel open and spacious. A bright style needs watching around the highlights, since pale sand blows out easily, but when it is balanced well the result feels fresh and modern.
Editing Golden Hour Dunes
Golden hour is the desert photographer’s best friend, and it is also the easiest light to overdo. The sun sits low, the dunes glow from within, and long shadows stretch across the sand like dark rivers. Begin by setting the overall brightness so the brightest crest still shows colour and the deepest shadow still shows ripple detail. Then choose a warm style that supports the light you actually saw, rather than inventing a sunset that never happened.
Work on the colour in small steps. A gentle lift in warmth will make the sand glow; a large one will make it look scorched. Check the palest sand in the frame as you go: if it starts turning yellow, you have gone too far. The same care applies to the sky, which should keep a soft gradient from warm near the sun to cooler tones overhead. When the balance is right, the photograph feels like standing in the desert at dusk — warm, quiet and vast.
Composition deserves the same attention as colour. A single dune crest crossing the frame diagonally can anchor the whole picture, while a small figure or a camel train gives the viewer a sense of scale. Keep the horizon level and give the sky room to breathe, since a desert photograph is as much about emptiness as it is about sand. For more ideas on warm light across different landscapes, the landscape photography presets guide covers golden light in hills and valleys too.
Desert Editing Mistakes to Avoid
The most common error is turning the sand orange. Cranking warmth until dunes glow like embers feels dramatic in the moment, yet anyone who has walked real sand recognises the exaggeration instantly. Instead, match the tint to what your eyes actually registered out there — a restrained amber that still reads as believable when you revisit the image long afterwards.
A second trap is losing the dune texture. Heavy contrast, strong clarity or aggressive sharpening can make ripples look crunchy and artificial, while too much smoothing erases them altogether. Aim for the middle ground: crisp enough to see the pattern, soft enough to feel like sand. Last, mind the horizon and the sky, since a tilted horizon or a banded sky can drain the calm from a quiet desert frame, so keep the horizon level and the colour smooth.
- Orange sand: warmth pushed so far that real dunes look like a painted backdrop.
- Lost ripples: dune texture smoothed away or sharpened into a crunchy pattern.
- Blown crests: the brightest sand turned to blank white with no colour left.
- Grey skies: a pale desert sky dulled by a preset that cools everything.
- Clashing frames: a series that jumps between warm, cool and vivid styles.
Frequently Asked Questions
What preset style suits desert photos best?
A warm, restrained style that keeps the sand honest and the dune ridges crisp suits most desert scenes best. It holds the heat of the place without turning the sand orange.
How do I stop desert sand looking orange?
Choose a preset that keeps cream, honey and rust tones separate, then ease the warmth back until the palest sand looks pale again. Checking the lightest dune in the frame is the fastest way to spot excess warmth.
Can one preset work for morning and evening desert shots?
Yes, provided you retune it through the day. Start from one warm base, then lift the darker areas a touch for early shots and pull the brightest sand back down as evening approaches — the base stays, only its exposure and tint shift with the hour.
Do desert presets work for beaches too?
They often do, since both settings share pale sand and bright skies, though beach frames usually need cooler tones and more care with the water. The beach photography presets guide covers seaside light in more detail.
Should desert photos be warm or bright?
Lean warm, but keep the lift modest — think of the soft amber of late afternoon across open sand. Grades that push everything into a single orange, or bleach the scene pale, both strip the landscape of what makes it distinctive, so steer between those two poles.
How do I keep dune detail in harsh sunlight?
Choose a grade that tames the brightest sand first, then bring the highlight slider down until each crest regains its tint and wind lines. Metering off the sand itself, instead of the sky, normally leaves you far more usable detail to shape.
Final Thoughts
What makes a desert image work is the sensation it leaves behind: heat on skin, quiet air, and ground stretching further than the eye can follow. Stick with one restrained warm grade for the set, keep ridge lines crisp and the pale sky intact, and resist the urge to push any slider to its limit. Done that way, your frames carry the place itself — wide sand, fierce sun, and a horizon that keeps receding.